
In the fast-evolving landscape of data management and analysis, Snowflake has emerged as a leading cloud-based data warehousing solution. Connecting to Snowflake’s SQL API using Python provides a powerful way to interact with your data and integrate it seamlessly into your applications. In this comprehensive guide, we’ll walk you through a Python script that utilizes Snowflake’s API, fetching data and uploading it to another table. Our focus is on establishing a secure connection and leveraging the flexibility of Python for data processing.
Understanding Snowflake SQL API
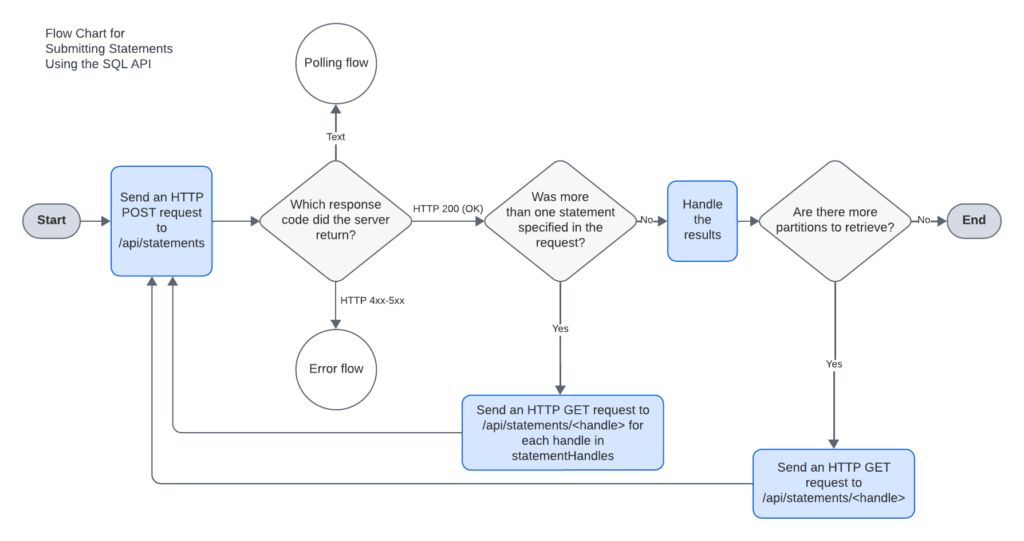
The Snowflake SQL API is a RESTful interface providing developers with versatile access to Snowflake databases. With capabilities ranging from executing queries to managing deployments, users can submit SQL statements, monitor execution status, cancel operations, and retrieve query results concurrently. The API, secured by network policies, organizes query results into partitions, yet has limitations, including unsupported commands like PUT and GET in Snowflake SQL and restrictions on certain transactional and session-altering operations. Despite these constraints, the Snowflake SQL API remains a potent tool for crafting custom applications and integrations tailored to Snowflake databases.
Python Script for Snowflake SQL API Interaction
The Python script provided in this guide acts as a bridge between your Python environment and Snowflake’s SQL API. Its primary functions include generating a JWT token for secure authentication, fetching data from Snowflake using the API, and uploading the retrieved data to another table. This script streamlines the process of data integration, allowing you to seamlessly incorporate Snowflake’s capabilities into your Python applications. The script’s modular structure and reliance on the requests library make it easy to understand and customize according to your specific use case.
By executing the script, you initiate a series of steps: establishing a secure connection to Snowflake, retrieving data based on your specified query, processing the fetched data, and finally, uploading it to another table. The use of a configuration file (config.ini) ensures flexibility, allowing you to adapt the script to different Snowflake configurations and destination tables effortlessly. Whether you are building data pipelines, automating analytics workflows, or enhancing your applications with real-time data, this Python script provides a foundation for efficient and secure Snowflake integration.
Setting the Stage: Configuration Setup
Before diving into the script, let’s ensure you have the right setup. The script utilizes a configuration file (config.ini) to manage Snowflake and destination table configurations. Ensure you have this file in place and populated with the required details.
[Snowflake]
SnowflakeAccount = your_account
SnowflakeUser = your_username
SnowflakePrivateKeyPath = /path/to/private_key.pem
SnowflakePrivateKeyPassword = your_private_key_password
SnowflakeUrl = https://your_account.snowflakecomputing.com
SnowflakeDatabase = your_database
SnowflakeSchema = your_schema
SnowflakeWarehouse = your_warehouse
SnowflakeRole = your_role
SnowflakeQuery = SELECT * FROM your_table

[DestinationTable]
destination_table_name = your_destination_table
Replace the placeholders (your_...) with your actual Snowflake account details and configurations.
Step 1: Generating JWT Token
The generate_jwt_token function initializes a JWTGenerator with your Snowflake configuration parameters, extracting the account, username, private key path, and password. It then obtains a JWT token using the get_token method. You can find the source code here
# Import statements and other functions...

def generate_jwt_token(snowflake_config):
    # Extract Snowflake configuration parameters
    snowflake_account = snowflake_config.get('SnowflakeAccount')
    snowflake_username = snowflake_config.get('SnowflakeUser')
    snowflake_private_key_path = snowflake_config.get('SnowflakePrivateKeyPath')
    snowflake_private_key_password = snowflake_config.get('SnowflakePrivateKeyPassword')

    # Initialize JWTGenerator with Snowflake configuration
    jwt_generator = JWTGenerator(account=snowflake_account,
                                 user=snowflake_username,
                                 private_key_file_path=snowflake_private_key_path,
                                 private_key_password=snowflake_private_key_password)

    jwt_token = jwt_generator.get_token()
    # Generate and return the JWT token
    return jwt_token
Step 2: Fetching Data from Snowflake
The get_data_from_snowflake function uses the JWT token and Snowflake configuration to make a request to the Snowflake API. It supports fetching data from multiple partitions if present.
# Import statements and other functions...

def get_data_from_snowflake(jwt_token, snowflake_config):
    # Extract Snowflake configuration parameters
    snowflake_url = snowflake_config.get('SnowflakeUrl')
    snowflake_database = snowflake_config.get('SnowflakeDatabase')
    snowflake_schema = snowflake_config.get('SnowflakeSchema')
    snowflake_warehouse = snowflake_config.get('SnowflakeWarehouse')
    snowflake_role = snowflake_config.get('SnowflakeRole')

    # Statement to fetch data (modify as needed)
    statement = snowflake_config.get('SnowflakeQuery')

    # Prepare headers and data payload...

    # Make the request to Snowflake API
    response = requests.post(snowflake_url, headers=headers, json=data)

    # Process the response...

    return {'data': all_data, 'columns' : all_columns,'column_types': column_types}
Step 3: Data Processing
Data processing is a critical step to extract meaningful insights. The process_data function extracts relevant data from the JSON response, including column names, data, and column types.
# Import statements and other functions...

def process_data(json_data, all_data, columns):
    # Extract the relevant data from the json_data for processing
    data = json_data.get('data', [])

    # Extract column names and types from the metadata...

    # Append the column names to the columns list if not already present...

    # Append the data to the all_data list...

    return {'data': all_data, 'columns': columns, 'column_types': column_types}
Step 4: Uploading Data to Snowflake
Now that we have fetched and processed our data, the next step is to upload it to another table. The upload_data_to_snowflake_table function takes care of this.
# Import statements and other functions...

def upload_data_to_snowflake_table(jwt_token, data_to_load, columns, snowflake_config, destination_table_config):
    # Extract configuration details...

    # Prepare headers and create the SQL statement...

    # Join all data rows into a single string...

    # Concatenate the SQL statement with the values...

    # Prepare data payload...

    # Make the request to Snowflake API...

    # Process the response...

    return None
Bringing It All Together: Main Execution
The main function serves as the entry point of the script. It reads the configuration file, generates a JWT token, fetches data from Snowflake, and uploads it to another table.
# Import statements and other functions...

def main():
    config = ConfigParser()
    config.read('config.ini')

    # Read snowflake configuration section...

    # Generate JWT Token...

    # Get data from Snowflake in Json format...

    # Upload the retrieved data to another table...

if __name__ == "__main__":
    main()
Snowflake SQL API Partitions
- The Snowflake API organizes data into partitions, and the number and size of each partition are determined by Snowflake based on the data returned by a SQL query.
- When a request is submitted, the response body includes a “partitionInfo” field containing an array of objects, each describing a specific partition of data.
- The first object in the array details the partition of data returned in the current response, while subsequent objects describe additional partitions that can be retrieved by submitting subsequent requests with “partition=partition_number.”
- Each object in the array specifies the number of rows and the size of a partition, providing metadata that an application can utilize to handle partitions returned in subsequent requests.
- An example response snippet is provided, including information such as “code,” “statementHandle,” “sqlState,” “message,” “createdOn,” and “statementStatusUrl.”
- The “resultSetMetaData” section includes details like the total number of rows, format (e.g., “jsonv2”), and the array of partition information with specific details on row count, uncompressed size, and compressed size for each partition.
- The “data” section illustrates sample data rows returned by the SQL query, with columns like customer information, address, postal code, and timestamp.
{
  "code": "090001",
  "statementHandle": "536fad38-b564-4dc5-9892-a4543504df6c",
  "sqlState": "00000",
  "message": "successfully executed",
  "createdOn": 1597090533987,
  "statementStatusUrl": "/api/v2/statements/536fad38-b564-4dc5-9892-a4543504df6c",
  "resultSetMetaData" : {
    "numRows" : 50000,
    "format" : "jsonv2",
    "partitionInfo" : [ {
      "rowCount" : 12288,
      "uncompressedSize" : 124067,
      "compressedSize" : 29591
    }, {
      "rowCount" : 37712,
      "uncompressedSize" : 414841,
      "compressedSize" : 84469
    }],
  },
  "data": [
    ["customer1", "1234 A Avenue", "98765", "2021-01-20
    12:34:56.03459878"],
    ["customer2", "987 B Street", "98765", "2020-05-31
    01:15:43.765432134"],
    ["customer3", "8777 C Blvd", "98765", "2019-07-01
    23:12:55.123467865"],
    ["customer4", "64646 D Circle", "98765", "2021-08-03
    13:43:23.0"]
  ]
}
Full source code on Snowflake SQL API using Python
from configparser import ConfigParser
import json
from urllib.parse import urljoin, urlparse
import requests
from sql_api_generate_jwt import JWTGenerator


def generate_jwt_token(snowflake_config):
    # Extract Snowflake configuration parameters
    snowflake_account = snowflake_config.get('SnowflakeAccount')
    snowflake_username = snowflake_config.get('SnowflakeUser')
    snowflake_private_key_path = snowflake_config.get('SnowflakePrivateKeyPath')
    snowflake_private_key_password = snowflake_config.get('SnowflakePrivateKeyPassword')

    # Initialize JWTGenerator with Snowflake configuration
    jwt_generator = JWTGenerator(account=snowflake_account,
                                 user=snowflake_username,
                                 private_key_file_path=snowflake_private_key_path,
                                 private_key_password=snowflake_private_key_password)

    jwt_token = jwt_generator.get_token()
    # Generate and return the JWT token
    return jwt_token

def get_data_from_snowflake(jwt_token, snowflake_config):
    # Extract Snowflake configuration parameters
    snowflake_url = snowflake_config.get('SnowflakeUrl')
    snowflake_database = snowflake_config.get('SnowflakeDatabase')
    snowflake_schema = snowflake_config.get('SnowflakeSchema')
    snowflake_warehouse = snowflake_config.get('SnowflakeWarehouse')
    snowflake_role = snowflake_config.get('SnowflakeRole')

    # Statement to fetch data (modify as needed)
    statement = snowflake_config.get('SnowflakeQuery')

    # Prepare headers
    headers = {
        'Accept': 'application/json',
        'Content-Type': 'application/json',
        'X-Snowflake-Authorization-Token-Type': 'KEYPAIR_JWT',
        'Authorization': f'Bearer {jwt_token}'
    }

    # Prepare data payload
    data = {
        "statement": statement,
        "timeout": "1000",
        "database": snowflake_database,
        "schema": snowflake_schema,
        "warehouse": snowflake_warehouse,
        "role": snowflake_role,
        "bindings": {},
        "parameters": {}
    }

    # Make the request to Snowflake API
    response = requests.post(snowflake_url, headers=headers, json=data)

    if response.status_code == 200:
        json_data = response.json()
        all_data = []
        all_columns = []
        # Process the first partition data
        data_info = process_data(json_data, all_data, all_columns)
        all_data = data_info['data']
        all_columns = data_info['columns']
        column_types = data_info['column_types']

        # Check if there are additional partitions
        link_header = response.headers.get('Link', '')
        next_partition_url = extract_next_partition_url(link_header, snowflake_url)
        # print (next_partition_url)

        while next_partition_url:
            # Make subsequent requests for additional partitions
            response = requests.get(next_partition_url, headers=headers)
            if response.status_code == 200:
                json_data = response.json()

                # Process the data for each additional partition
                data_info = process_data(json_data, all_data, all_columns)
                all_data = data_info['data']
                all_columns = data_info['columns']
                column_types = data_info['column_types']
                # Check for more partitions in the Link header
                link_header = response.headers.get('Link', '')
                next_partition_url = extract_next_partition_url(link_header, snowflake_url)
                print (next_partition_url)
            else:
                print(f"Error fetching additional partitions: {response.status_code}")
                print(response.text)

    return {'data': all_data, 'columns' : all_columns,'column_types': column_types}

def extract_next_partition_url(link_header, base_url):
    # Extract the URL for the next partition from the Link header
    links = link_header.split(',')
    for link in links:
        if 'rel="next"' in link:
            url = link.split(';')[0].strip('<>')
            # Add the base_url as the scheme
            parsed_url = urlparse(base_url)
            if "api/v2/statements/" in parsed_url.path:
                base_path = parsed_url.path.rstrip('/')  # Remove trailing slash from path
                return urljoin(f"{parsed_url.scheme}://{parsed_url.netloc}{base_path}", url)
            else:
                return urljoin(f"{parsed_url.scheme}://{parsed_url.netloc}", url)
    return None


def process_data(json_data, all_data, columns):
    # Extract the relevant data from the json_data for processing
    data = json_data.get('data', [])

    # Extract column names and types from the metadata
    result_set_metadata = json_data.get('resultSetMetaData', {})
    columns_info = result_set_metadata.get('rowType', [])
    column_names = [column_info['name'] for column_info in columns_info]
    column_types = {column_info['name'].upper(): column_info['type'].upper() for column_info in columns_info}


    # Append the column names to the columns list if not already present
    if not columns:
        columns.extend(column_names)

    # Append the data to the all_data list
    all_data.extend(data)

    return {'data': all_data, 'columns': columns, 'column_types': column_types}

def upload_data_to_snowflake_table(jwt_token, data_to_load, columns, snowflake_config, destination_table_config):
    target_table = destination_table_config.get('destination_table_name')
    snowflake_url = snowflake_config.get('SnowflakeUrl')
    snowflake_database = snowflake_config.get('SnowflakeDatabase')
    snowflake_schema = snowflake_config.get('SnowflakeSchema')
    snowflake_warehouse = snowflake_config.get('SnowflakeWarehouse')
    snowflake_role = snowflake_config.get('SnowflakeRole')

    # Prepare headers
    headers = {
        'Accept': 'application/json',
        'Content-Type': 'application/json',
        'X-Snowflake-Authorization-Token-Type': 'KEYPAIR_JWT',
        'Authorization': f'Bearer {jwt_token}'
    }

    # Create the SQL statement
    placeholders = ', '.join(['?' for _ in range(len(columns))])
    statement = f"INSERT INTO {target_table} ({', '.join(columns)})"

    # Join all data rows into a single string
    # values = ', '.join([f"({', '.join(map(str, row))})" for row in data_to_load])
    values = ', '.join(["({})".format(', '.join("'{}'".format(str(value)) for value in row)) for row in data_to_load])


    # Concatenate the SQL statement with the values
    full_statement = f"{statement} VALUES {values}"
    # print(full_statement)
    # Prepare data payload
    data = {
        'statement': full_statement,
        'timeout': '1000',
        'database': snowflake_database,
        'schema': snowflake_schema,
        'warehouse': snowflake_warehouse,
        'role': snowflake_role,
        'bindings': {},  # No explicit bindings
        'parameters': {}
    }

    # Make the request to Snowflake API
    response = requests.post(snowflake_url, headers=headers, json=data)

    if response.status_code == 200:
        print("Data inserted successfully.")
    else:
        print(f"Error inserting data: {response.status_code}")
        print(response.text)


def main():
    config = ConfigParser()
    config.read('config.ini')

    #Read snowflake configuration section
    snowflake_config = config['Snowflake']

    # Generate JWT Tokem
    jwt_token = generate_jwt_token(snowflake_config)

    # Get data from Snowflake in Json format
    data = get_data_from_snowflake(jwt_token, snowflake_config)
    all_data = data['data']
    columns = data['columns']
    column_types = data['column_types']

    # Upload the retrieved data to another table
    destination_table_config = config['DestinationTable']
    upload_data_to_snowflake_table(jwt_token, all_data, columns, snowflake_config, destination_table_config)

if __name__ == "__main__":
    main()
Conclusion
Connecting to Snowflake’s SQL API using Python offers a robust solution for managing and analyzing your data. This guide has provided you with a step-by-step walkthrough of a Python script that leverages Snowflake’s API to fetch and upload data securely. By following the outlined steps and customizing the script to your specific needs, you can seamlessly integrate Snowflake with your Python applications. Empower your data-driven solutions with the combined capabilities of Snowflake and Python, and take your data integration to new heights.
For more in-depth information and examples, refer to the official Snowflake documentation.
Start connecting to Snowflake with Python today and unlock the full potential of your data-driven applications!